

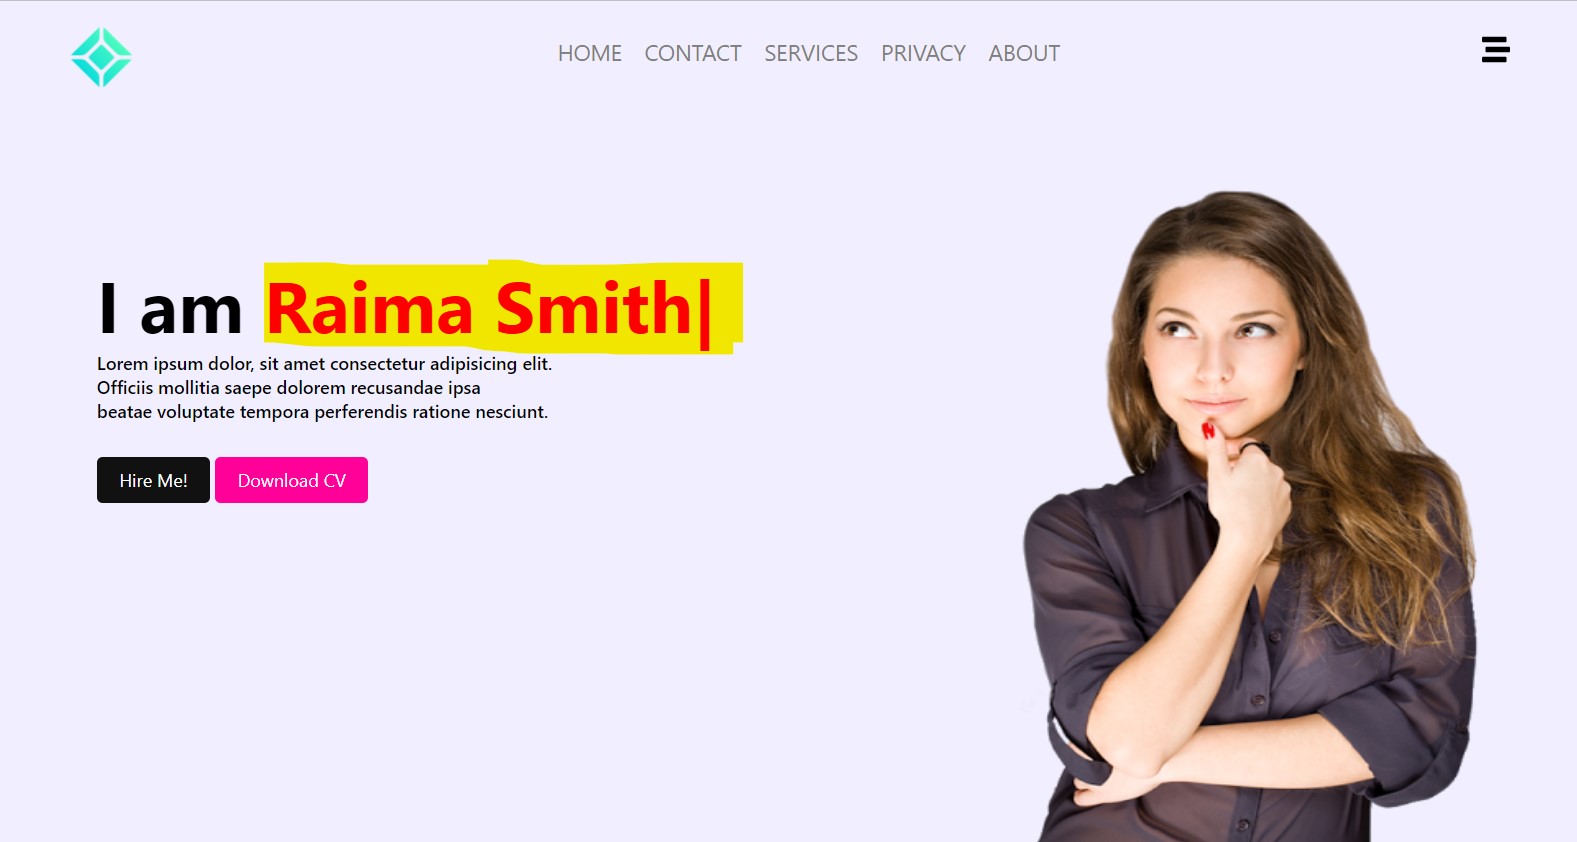
Hi dear welcome to Ascode Blog . In this post we are going to learn how to make auto tyipng website designing using html css and javascript. First Creat A index.html file Copy This HTML CODE and pest it one your code editor. 2ndly creat style.css file Then Copy The CSS CODE and pest it then open the index.html file with your browser.
HTML
<!DOCTYPE html>
<html lang="en">
<head>
<meta charset="UTF-8">
<meta http-equiv="X-UA-Compatible" content="IE=edge">
<meta name="viewport" content="width=device-width, initial-scale=1.0">
<link rel="stylesheet" href="style.css">
<title>Typed Website design</title>
</head>
<body>
<div class="navbar">
<div class="logo"><img src="/nav-logo.png"></div>
<div class="nav-center">
<ul>
<li><a href="#">HOME</a></li>
<li><a href="#">CONTACT</a></li>
<li><a href="#">SERVICES</a></li>
<li><a href="#">PRIVACY</a></li>
<li><a href="#">ABOUT</a></li>
</ul>
</div>
<div class="nav-right">
<img src="/bars.svg" >
</div>
</div>
<div class="container">
<h1>I am <span class="auto-input">!</span></h1>
<p>Lorem ipsum dolor, sit amet consectetur adipisicing elit.<br> Officiis mollitia saepe dolorem recusandae ipsa<br> beatae voluptate tempora perferendis ratione nesciunt.</p>
<a href="#">Hire Me!</a>
<a class="btn" href="#">Download CV</a>
</div>
<img class="girl" src="/girl.png" alt="">
<script>
var typed = new Typed(".auto-input", {
strings: ["", "Raima Smith", "A Blockchain Developer", "A UI designer"],
typeSpeed:100,
backSpeed:100,
loop:true
})
</script>
</body>
</html>
CSS
*{
margin: 0;
padding: 0;
font-family: -apple-system, BlinkMacSystemFont, 'Segoe UI', Roboto, Oxygen, Ubuntu, Cantarell, 'Open Sans', 'Helvetica Neue', sans-serif;
box-sizing: border-box;
}
body {
background: #f0eeff;
width: 100%;
width: 100vh;
}
.navbar {
display: flex;
position: absolute;
top: 0;
width: 100%;
padding: 20px;
justify-content: space-between;
}
.navbar .logo {
margin: 0 5%;
width: 60px;
line-height: 50px;
}
.navbar .logo img {
width: 100%;
}
.navbar .nav-center {
margin: 0 5%;
justify-content: center;
}
.navbar .nav-center ul {
display: flex;
}
.navbar .nav-center ul li {
list-style: none;
}
.navbar .nav-center ul li a {
text-decoration: none;
font-size: 20px;
margin: 0 10px;
color: #7e7e80;
line-height: 50px;
}
.navbar .nav-center ul li a:hover {
color: #f09;
text-decoration: underline;
}
.navbar .nav-right {
margin: 0 5%;
width: 25px;
line-height: 60px;
}
.navbar .nav-right img {
width: 100%;
}
.container {
position: absolute;
top: 30%;
left: 8%;
}
.container h1 {
font-size: 4rem;
font-weight: 700;
}
span {
color: #f09;
}
.container p {
font-size: 1rem;
font-weight: 500;
}
.container a {
text-decoration: none;
display: inline-block;
margin: 30px 0;
padding: 10px 20px;
font-size: 1rem;
color: #fff;
background: #111;
border-radius: 5px;
}
.container a.btn {
background: #f09;
}
.container a.btn:hover {
background: #111;
}
.container a:hover {
background: #f09;
}
.girl {
position: absolute;
bottom: 0;
right: 8%;
width: 450px;
height: 600px;
}


2 Comments
helo
ReplyDeletethanks
Delete